The Future is Bright: Unlocking the Benefits of LED Light Therapy
In the ever-evolving landscape of beauty and skincare, there’s a treatment that has been capturing the attention of enthusiasts and experts alike – LED light therapy. Anyone dealing with an unwanted skin condition knows how difficult and disheartening it can be to treat. Whether it be pigmentation due to sun-damage, an unwanted acne flare-up that you cannot seem to get under control or some pesky frown lines you hate the look of – rest assured, LED light therapy can address all these common skin concerns and much more.
Light-emitting diode, or LED as it is commonly known, has enjoyed a recent spike in popularity due to its efficacy as a multi-faceted skin corrective facial treatment. So, if you were wondering how exactly these fancy multi-coloured lights work, then then read on to discover the healing power of light therapy and how your skin can benefit from it.
In this article, we unravel the mysteries of LED, diving into its essence and origin story, how it works and who it can benefit., So join us as we unveil the secrets behind this cutting-edge treatment and discover the transformative effect it can have on your skin!
Outer limits….LED’s space age technology
LED and the practical application of light therapy has an incredibly interesting origin story – not to mention scientific. NASA originally began experimenting with LED during the 1960’s in in the hope that through stimulating plant growth, astronauts in space would have the ability to grow their own food supply. It was during these studies that scientists accidently stumbled across further applications for LED light – namely its healing properties when applied to the human body.
This extremely fortuitus discovery sparked much interest in LED technology: namely the possible medical applications and throughout the 1990’s, the U.S navy seals began using LED to help regenerate damaged tissue, healing wounds much more quickly.
It was discovered that by varying the colour of the lights, different cellular responses could be triggered within the body, biological processes that assist the skin’s natural healing and rejuvenation process.
With their strange, beautiful glow and almost otherworldly appearance, it’s no surprise that LED lights have captured people’s imagination – especially when paired with their futuristic origins and proven effectiveness in treating a range of skin concerns. Over the past few years, LED technology has gained serious traction as both a popular skincare treatment and a wellness practice.
Colourful powered wavelengths
If you asked the average person to describe what they think of when it comes to LED – most may think of the type found in common household lighting. The lights used in professional LED light therapy machines however, are definitely NOT your average, run-of-the-mill light bulbs!
Standard LED lights emit far less energy and do not have the ability to impact our bodies in the same way. Light machines offer a wide spectrum of lights from the visible spectrum (coloured) such as red, blue, green, yellow and combinations of these, through to the invisible (otherwise known as infrared).
LED light machines work by offering wavelengths of coloured light at varying depths. Depending on the depth and colour used, each triggers its own unique corresponding biological effect on the body, resulting in a wide variety of different skincare benefits.
Red Light – Anti ageing superpowers
Red LED is an extremely versatile wavelength that promotes overall skin rejuvenation by stimulating the production of collagen and elastin – think of it as your go-to for all things anti-ageing. Experts believe that red light can be hugely beneficial at improving the signs of ageing by targeting the skin cells that are responsible for the body’s collagen production, otherwise known as fibroblasts.
As we age, our body’s process’s start to slow down and one of the many things we start to produce less of is collagen. Collagen loss can lead to anything from dull, tired, lifeless skin, the loss of elasticity and volume, thinning and lax skin, moisture loss, age spots, those pesky fine lines as well as deeper wrinkles and expression lines. By boosting skin’s collagen and elastin levels, we can encourage it to look smoother, younger and plumper overall.

Blue Light – Acne fighting power
Blue light is an extremely effective tool for treating acne related conditions and is commonly used to treat acne-prone skin. Blue light works as an antibacterial to prevent future breakouts while also stabilising overactive oil production and reducing the appearance of active inflamed acne lesions.
Sebaceous glands are small oil-producing glands in the skin that are necessary for lubricating your skin and hair. They can however become over-active, leading to excess oil production and subsequently, acne. Blue light effectively reduces the activity in these glands and kills off the bacteria caused by acne deep within the skin, leading to an improvement in pimples and active acne as well as helping to prevent future breakouts.

Purple – A powerful combination
Purple LED is a combination of red and blue wavelengths, offering dual benefits of both skin with the red light targeting the inflammation and the blue light targeting the acne-causing bacteria in the skin, including for painful cystic acne. Purple is also beneficial for cellular oxygenation and regeneration to promote enhanced skin fitness and vitality.
Green and Yellow – Calm, brighten and heal
For those of us who are guilty of perhaps spending too much time in the sun when we were younger, green light is very effective at treating sun damaged skin. By breaking down clusters of melanin that form discolourations, green light can address the appearance of sunspots, pigmentation, freckles, sunspots and overall discolouration.
Yellow light is used as a restorative therapy to improve the overall health of your skin as well as for healing, as it’s known to trigger the lymphatic system, removing toxins from the treated area. It can also assist with reducing redness, swelling and rosacea to improve overall skin tone and balance.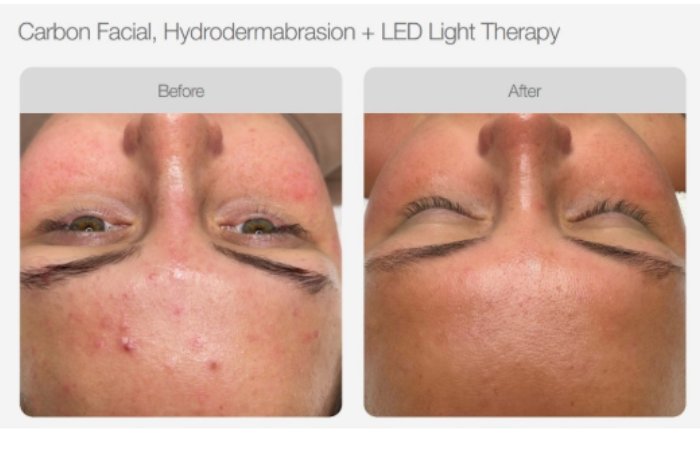
Convenient and safe
LED light-based therapy is pain-free, non-invasive and requires no post-treatment recovery or downtime, making it an attractive solution for those looking to treat their skin concerns.
You must speak to your practitioner if you are on any type of medication that can increase your sensitivity to light, but otherwise it is a safe option for all skin types.
A single facial session with an LED machine will last approximately 20-30 min and can run between $50-$150, depending on where you live and if the therapy is combined with other treatments. Your practitioner is most likely to recommend a course of several treatments, depending on what your individual skin needs are and what you are looking to treat. Light therapy can be used on the face, neck, chest and hands, with most finding the treatment an extremely enjoyable and overall relaxing experience.

Although extremely effective as a stand-alone tool, light therapy also works wonderfully when layering in conjunction with other treatments, with many facials experience including LED Light Therapy as part of the overall service. As an extremely useful tool for soothing, restoring and healing the skin, LED is a great final step to unite all the benefits post-treatment.
Not only do LED treatments leave your skin with an undeniable glow, treatments also invoke the feeling of summer, making it a wonderful treatment to enjoy in winter. The combination of warmth and light can boost your immune system, lower stress hormones and leave you with that feel-good feeling – just lay back and let the lights work their magic!
To learn more about LED light therapy equipment, contact The Global Beauty Group team on 1300 006 607